Boost your user stories with the friendly Archiy Issue Assistant! This handy tool makes your user stories clearer and more engaging, so your team can easily share ideas. Discover how to navigate the user story screen, kick off the assistant, and apply helpful tips to enhance your writing journey. With simple advice and a focus on teamwork, you’ll craft user stories that make a real difference in your projects. Dive into the key steps to level up your user story skills today!
Unlock the potential of your projects with Archy Insights! Our AI system generates valuable insights every 48 hours, helping you identify areas for improvement. Focus on financial health and risk assessment to draft actionable items that enhance efficiency. Manage insights wisely and generate backlog items aligned with your goals. Embrace continuous improvement and equip your team to navigate challenges effectively.
For our valued beta users, here is a short tutorial on how to install beta application in Jira.
Beta versions are pre-release
Installing a beta application in Jira Cloud, such as our innovative AI-driven Agile assistant, Archy, is a straightforward process that can significantly enhance your project management capabilities. This tutorial will guide you through each step to ensure a smooth installation and setup.
Step 1: Access Jira Cloud
Log In: Start by logging into your Jira Cloud account. You’ll need administrative privileges to install new apps, so ensure you have the right access level.
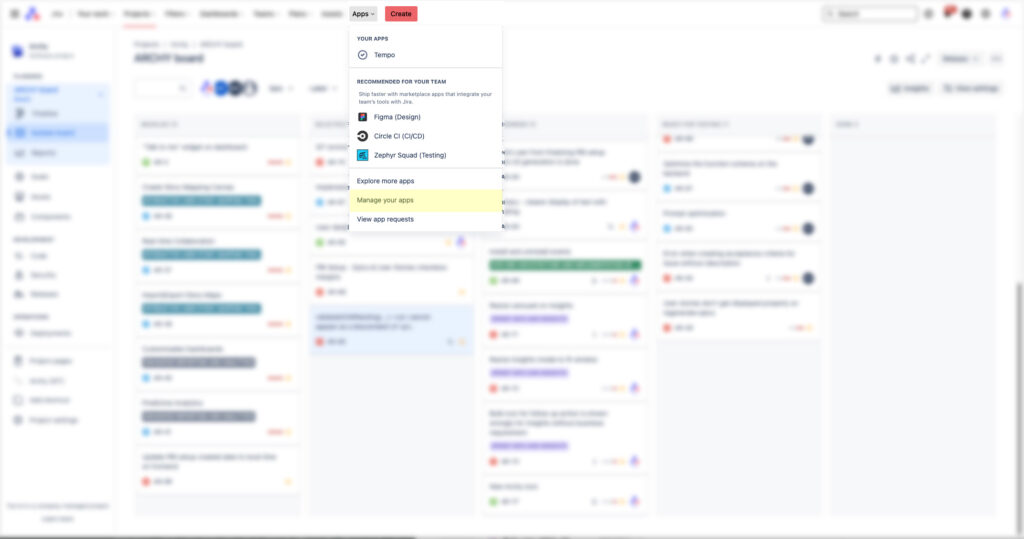
Step 2: Navigate to “Apps”
Find “Apps”: Once logged in, look for the “Apps” option in the top navigation menu. Click on it to access the App Management section.
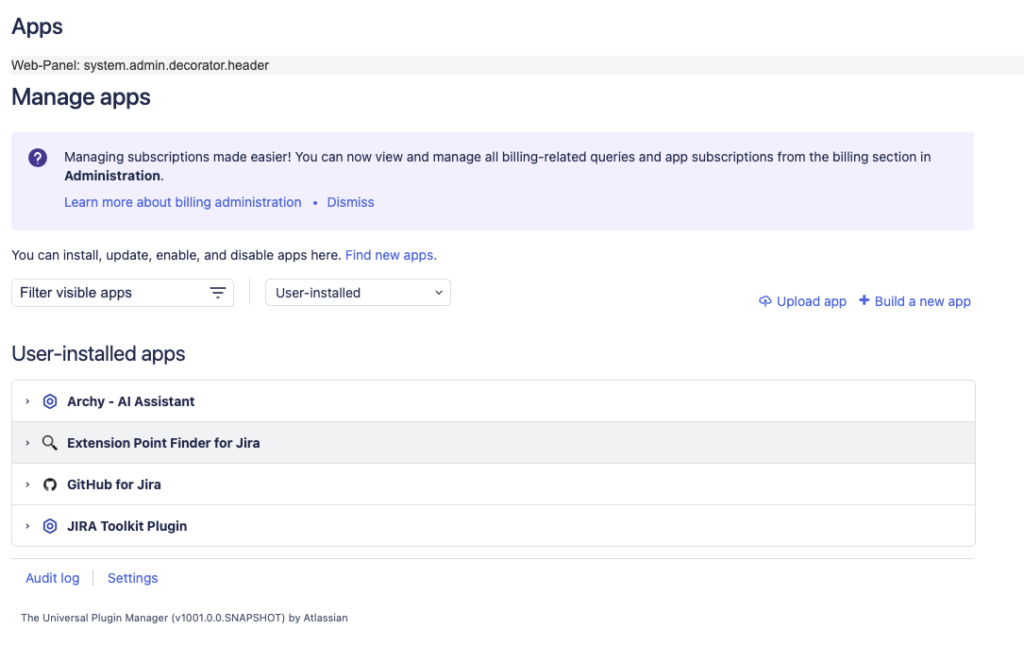
Step 3: Install App Using URL
Find “Settings”: Within the “Manage apps” section, look for a settings icon or a similar option that opens up additional settings or actions.
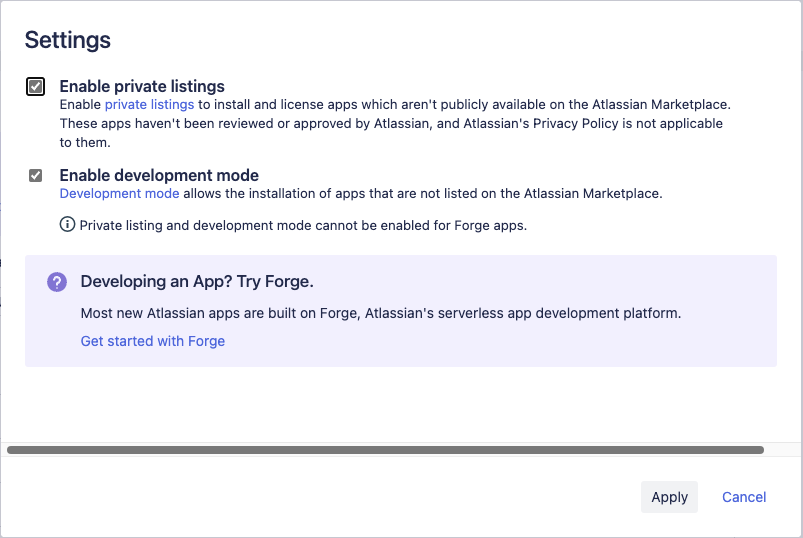
Click on Settings to configura options on application installation sources:
Click “Apply” and you will see new option “Upload app”.
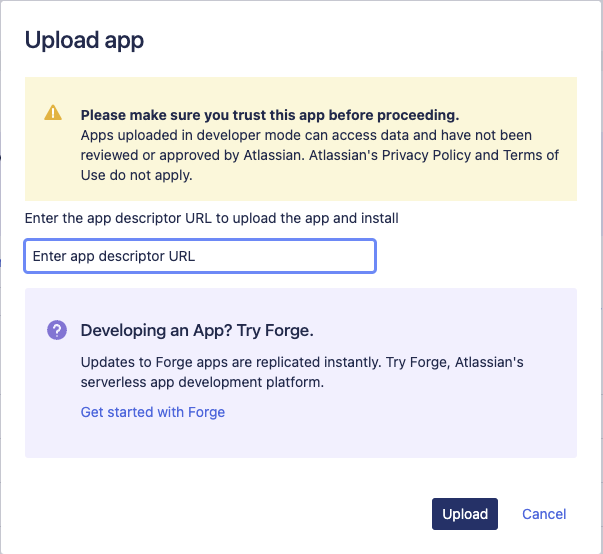
Select “Upload app”: You might see an option labeled “Upload app”, “Install app from URL”, or something similar under the settings or actions menu. Click on this to proceed.
Enter App URL: In the provided field, enter the URL given to you for the beta application. This link is generated on Atlassian marketplace for non-public apps ( apps that can’t be found on Marketplace, as they have not been made public ). We use this feature to better control how our users install beta application version. URL for beta app will be provided in email that you will receive once you’ve applied for beta user access.
Confirm Installation: After entering the URL, there may be a confirmation step where you’ll review the app permissions or other details. Review these carefully and proceed if everything is correct.
And that is it !
Enjoy using Archy and please leave feedback within the app.
Browse through our tutorials to find out more on how to use Archy, and how to get the best results with your Archy assistant.
Archy: AI Agile Assistant for Jira - Release Notes
Version: 1.1.0 Release Date: 05th February 2024
We are thrilled to announce the launch of Archy, the AI Agile Assistant for Jira, designed to revolutionize the way teams manage their Agile projects.
Archy is built to empower product owners, managers, and teams by automating routine tasks, providing deep project insights, and enhancing productivity.
Initial Features
PBI (Product Backlog Items) Automation: Automatically create Product Backlog Items (PBIs) directly within Jira with AI-driven suggestions for improvement.
Epic and User Story Management: Simplify the creation and organization of epics and user stories, making it easier to keep your project’s goals in clear focus.
Acceptance Criteria Generation: Use AI to generate precise acceptance criteria for your project items, ensuring clarity and quality in deliverables.
Project Summary and Insights: Get comprehensive summary and actionable insights into your project’s health, progress, and potential bottlenecks.
Seamless Jira Integration: Designed to integrate flawlessly with Jira, enhancing your existing workflows without the need for extensive setup.
Improvements
User Interface Enhancements: Enjoy intuitive and user-friendly interface, making navigation and task management smoother.
Performance Optimization: Experience faster load times and more responsive interactions throughout the app.
Getting Started
To get started with Archy:
Install the Archy AI Agile Assistant from the Atlassian Marketplace. Navigate to your project and select Archy icon from project menu. Start creating PBIs, managing epics, and generating insights with AI assistance!
Thank you for choosing Archy to enhance your Agile project management. We’re excited to be part of your journey and look forward to bringing you even more features and improvements in future updates.